In Part I I looked at the studio flash unit and some of the controls. In this post I’ll take a look at how to translate the studio flash settings to settings on your camera and the actual lighting setup used. There are some good resources out there to help with this, see for example Guess the Lighting and also Strobox. However you can only do so much reading around this subject and eventually need to actually get into the studio and play around with the lighting. In Part III I give some tips on hiring studios and models.
Here’s a portrait I took recently of the model ‘Darling’ at Tip Top Photography in the Jewellery Quarter of Birmingham.

The lighting setup was as shown in this diagram (created using LightingDiagram):
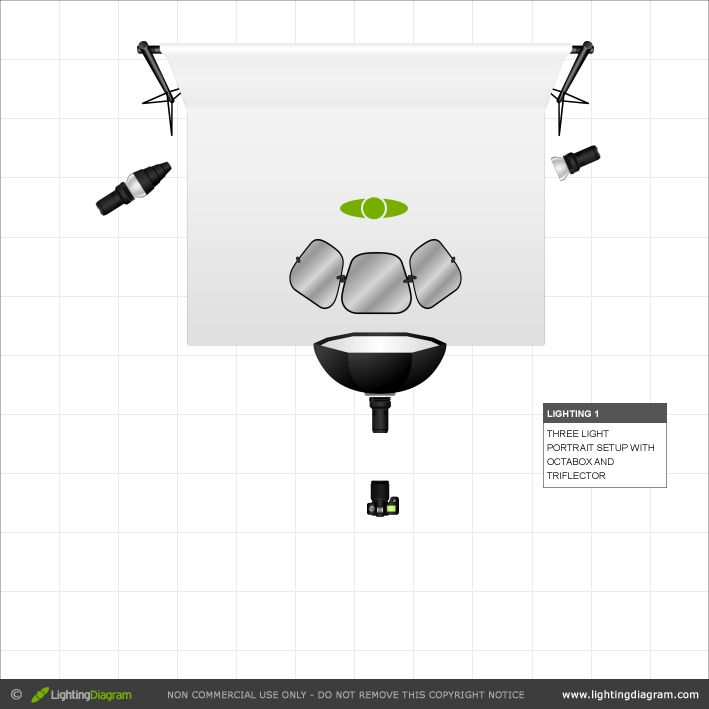
As you can see I used three studio flashes, a triflector and an octabox for this setup. The triflector was beneath the model roughly at her waist level and the main (key light) flash, with large octabox, above her pointing down at her face. There was a background light with a snoot pointing at the background and a final hair light pointing down on the models hair to the back right looking from the direction of the camera. The camera was positioned beneath the octabox positioned so as to be just above the triflector.
As you can see from the camera settings the aperture was set to f/8 which is what was measured from the key light using a Sekonic L-308S light meter set to flash mode and to measure incident light. This means holding the light meter quite close to the model pointing at the flash with the lumisphere slid over the meter cell. I like to meter each flash separately which means taking separate readings from each flash with the others turned off so as not to affect the reading. The background light (with snoot) was set to give one stop more light (i.e. set to f/11) and the hair light set to the same as the key light (i.e. f/8). The shutter speed on the camera (my trusty Olympus OM-D with M.ZUIKO 45mm f/1.8 lens) was set to 1/125. Remember that when using flash the shutter speed does not matter as long as you don’t exceed your cameras sync speed as the exposure is controlled by the flash duration rather than your cameras shutter (that’s assuming you don’t want to worry too much about any natural light that may also be present).
I find this setup gives a fantastic flattering light to a model and also highlights the hair nicely with the background light giving a bit of separation between the model and background. It’s worth experimenting with precise positioning of the two secondary lights to get the desired effect and also turning one or both off to see what impact this has on the final image.


Leave a comment