One of the reasons I have decided to invest some time in learning Lightroom and Photoshop is because of the additional control it can give the photographer in processing images. In the past I have relied on “quick fix” programs like Portrait Professional and Perfect Photo Suite to edit images. Whilst these are fine applications in their own right they do not give you the ultimate pixel level editing that Photoshop does. The downside of Lightroom and Photoshop of course is that to get really proficient in using them requires a fairly significant amount of investment in time.
One of the ways I intend to learn these programs is to do some real projects and learn how to make the edits I, and hopefully my clients, want. As I learn more in the future I may of course re-visit previous editing sessions. So, for a start, here’s how I go about making the ‘perfect’ (well, for now) black and white portrait. I’ll be using layers and layer masks a lot here so for a quick review of what these are and how they work it’s worth taking a look at this excellent article.
Here’s a picture of Erika I took on a shoot we did recently with a makeup artist and hair stylist.

Whilst the basic image is okay it could do with a bit of work to improve it. Most notably:
- Exposure correction (basically the image is over-exposed by around 1/2 to 2/3 -stop I think) and cropping the image to make the frame a bit tighter.
- Skin toning to try and even out the brightness and colour of the skin (Erika’s arms and chest are a different tone due to a combination of light and makeup differences).
- Fixes in complexion and removal of some stray hairs.
- Brighten her eyes a little and remove any stray blood vessels and some eye lash sharpening maybe?
- Finally convert to black and white.
Step #1: Exposure Correction and Cropping
Selecting the image in Lightroom’s ‘Develop’ module I make some initial adjustments with the sliders, namely:
- Reduce ‘Exposure’ by 0.7 (2/3 stop).
- Take ‘Highlights’ down by -25 to reduce a bit further the over-exposure of the arms and chest.
- Increase the ‘Vibrancy’ a little (by +20).
- Finally I’ve chosen a square crop as I’m quite into square portraits at present.

Here’s the image following these adjustments as it will appear prior to being exported into Photoshop.

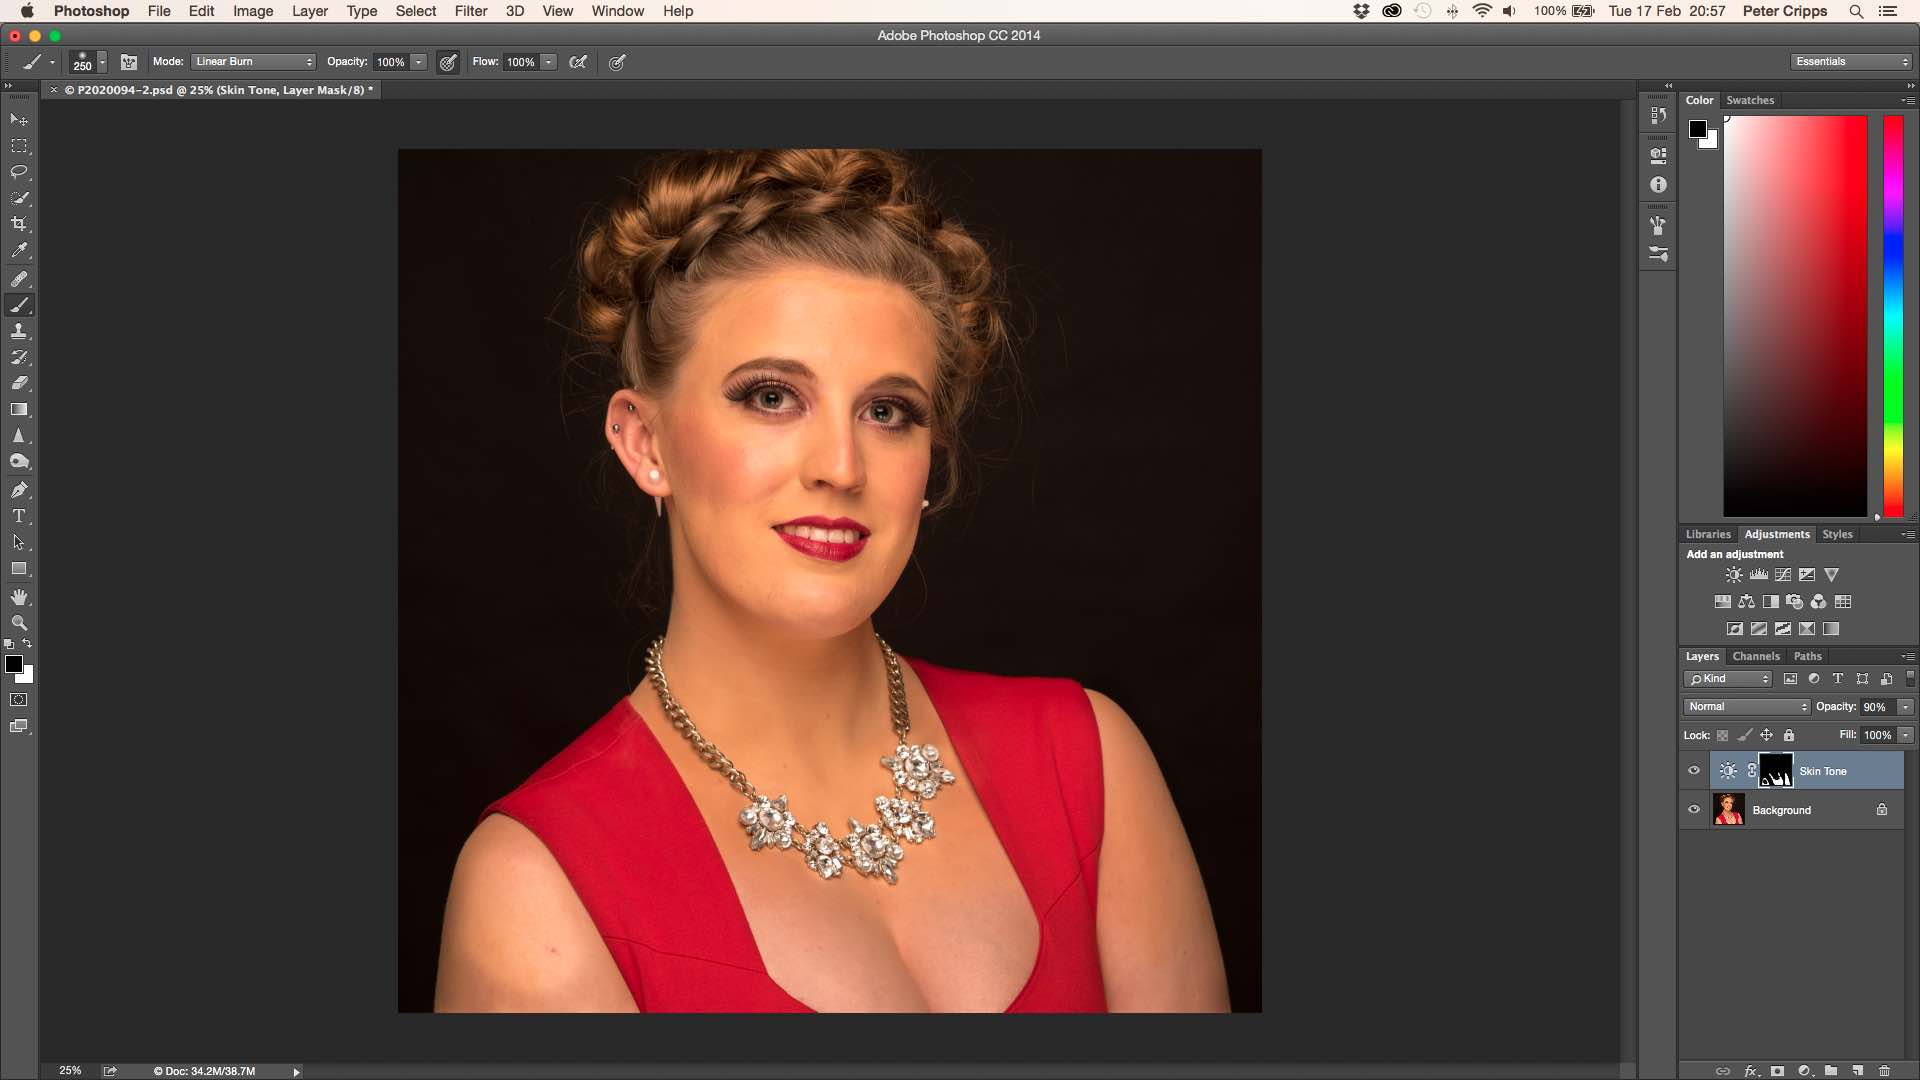
Step #2: Skin Toning
Next I want to try and even out the skin tones a little to remove the brightness around the upper arms and chest where no makeup was applied. For this and the next steps I’m moving into Photoshop. Following my image management routine I export the image from its current ‘Camera RAW’ folder into the ‘Processed’ folder (using File/Export in Lightroom) and tell Lightroom to open the image in Photoshop once the export is done. I reckon I can do most of what I want by adjusting the brightness of different parts of the picture. For another and more detailed approach involving changing the skin colour see this video from phlearn.com. Here’s the process I’ve used for skin toning once the image is open in Photoshop:
- Create a new image adjustment layer (click on the icon in the bottom of the ‘Layers’ panel and select the ‘Brightness/Contrast…’ layer. I’ve named this layer ‘Skin Tone’.
- In the dialog box that opens adjust brightness and contrast. I move the ‘Brightness’ slider to the left (i.e. make the image darker) to -35.
- This has darkened the whole image which is not what we want. To just adjust the bits we want I select the layer mask thumbnail and if it is white (which it is by default) use ‘Cmd I’ to invert the mask and make it black.
- Now I select the ‘Brush’ tool (from the tool palette on the left or by pressing the ‘B’ key), change the size of the brush (with the ‘[‘ or ‘]’ keys, make sure the brush is white and then paint the arms and chest area. This exposes the darker areas of the image so makes the areas we paint darker.
- If they don’t quite match we can reduce the opacity (I’ve reduced it to 90%) a little to match as closely as possible to the areas of the face.
Here’s what the image looks like now in Photoshop having made these adjustments. Note I’ve deliberately left the upper part of her right arm un-retouched to show the difference in tones.
Step #3: Fixes in Complexion
Next I’ll fix minor blemishes in Erika’s complexion, remove a few stray hairs and I don’t like how her ear piercing on her left ear (image right) shows as a white dot so I’ll get rid of that.
- Create a new copy of the background layer (select the background and then ‘Cmd J’ to create a copy). This gives me a layer which I have named ‘Complexion’.
- Working in that layer I use a combination of the ‘Spot Healing Brush’ tool and the ‘Healing Brush’ tool to remove the odd spot some annoying stray hairs in the background.
- I use the amazing ‘Content Aware Fill’ tool to remove the ear attachment. I do this by selecting the attachment using the ‘Lasso’ tool then select Edit/Fill…
Here’s what the image looks like now in Photoshop having made these adjustments.

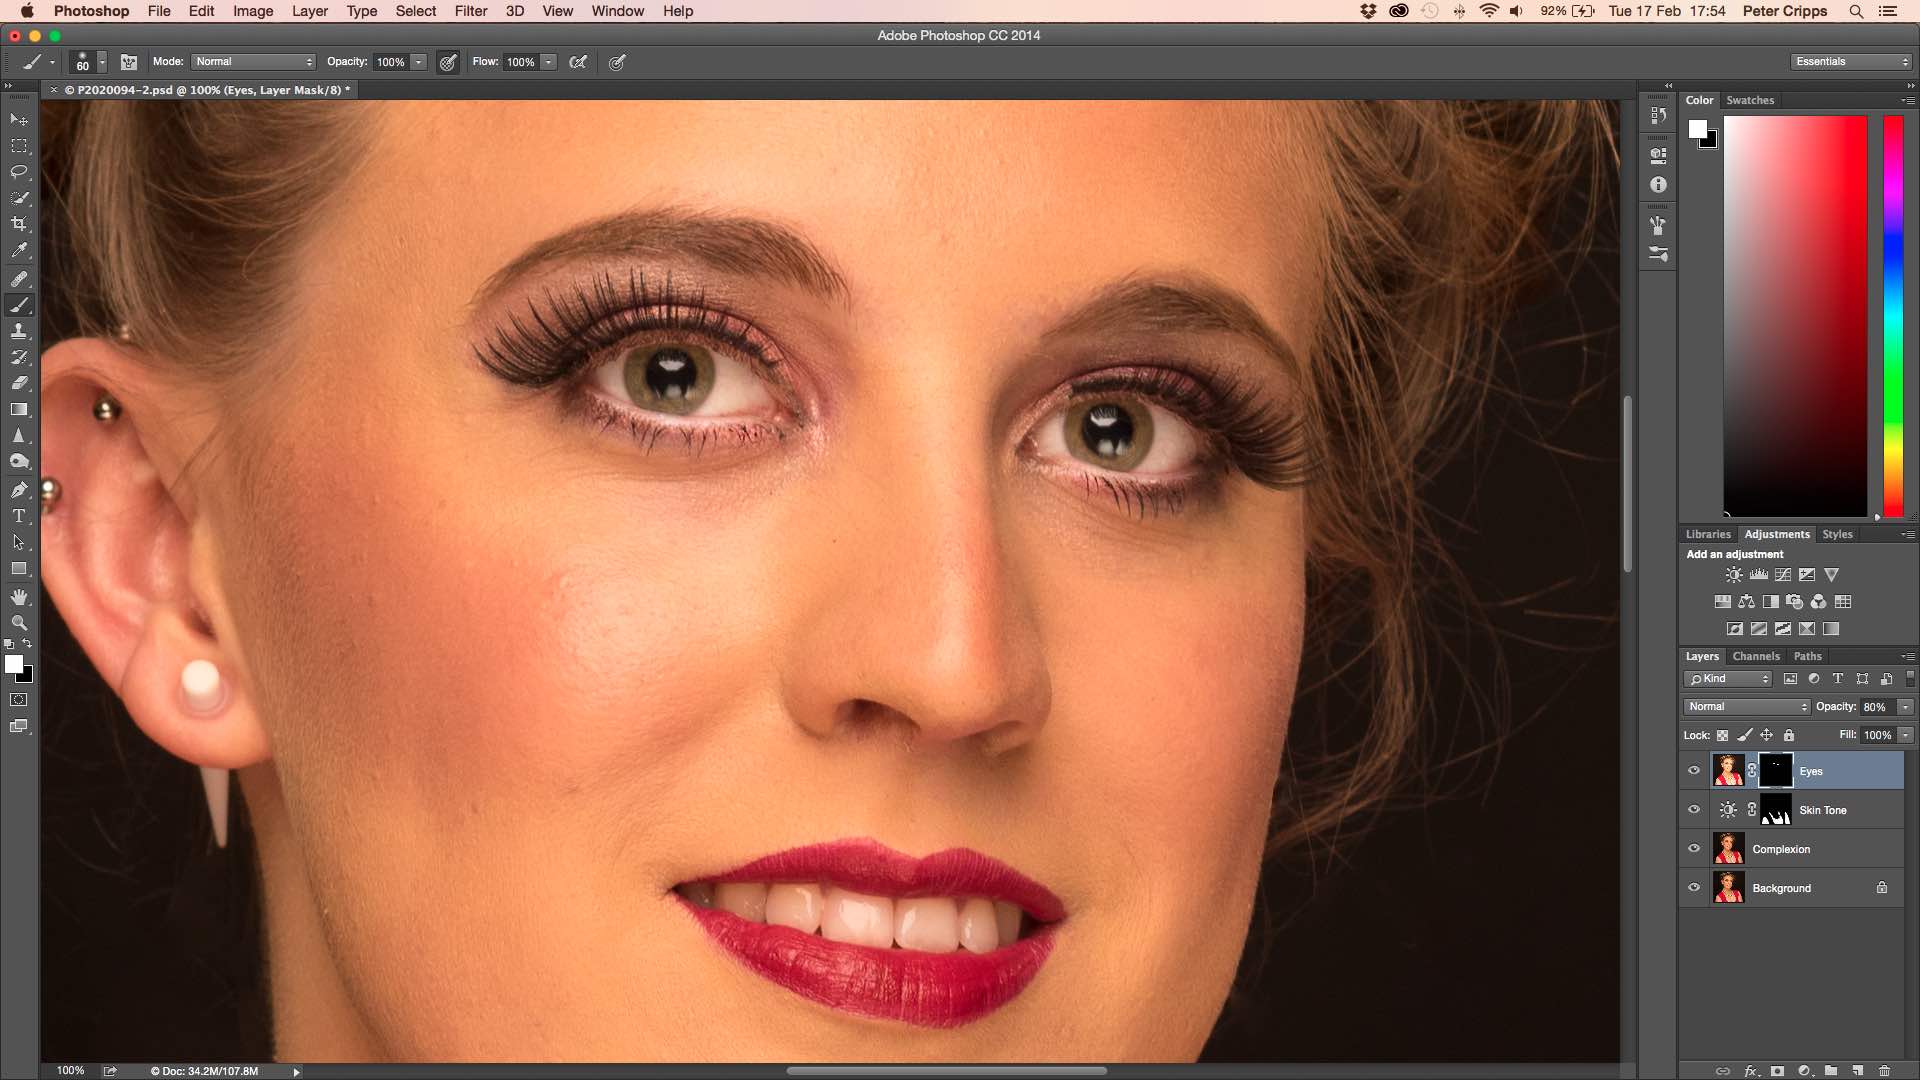
Step #4: Fix and Brighten the Eyes
To fix blemishes in the eyes and sharpen the eyelashes I did the following:
- Create a new copy of the background layer (select the background and then ‘Cmd J’ to create a copy). This gives me a layer which I have named ‘Eyes’.
- Working in this new layer I use the ‘Spot Healing Brush’ tool to remove the odd blood vessel in the eyes.
- Next I select the ‘Sharpen’ tool and drag it over the lower eyelashes, the upper ones don’t need fixing, to sharpen them up a bit.
Next I’m going to brighten up the eyes a little using a mask added to the last layer I made, as follows:
- First I brighten the whole of the layer ‘Eyes’ using Image/Adjustments/Brighten/Contrast… I move the brightness slider up to the appropriate level, around +30.
- Making sure I have the layer called ‘Eyes’ selected I create a mask on that layer by selecting ‘Mask’ at the bottom of the ‘Layers’ panel.
- By default the mask is white which reveals all the layer. Press ‘Cmd I’ to invert the mask to black which hides the current layer.
- I then use the ‘Brush’ tool to paint over the eyes and reveal the brighter layer for just the eyes. If the eyes look too bright then I can adjust the ‘Opacity’, which I have done, down to 80%.
Here’s what the image looks like now in Photoshop having made these adjustments. I’m not sure about the eyes yet, they may be a bit too bright but I’m going to wait until I convert to black and white before adjusting them further. The great thing about operating in layers like this is that you can always go back to the appropriate adjustment layer and change things.
Step #5: Convert to Black and White
There are lots of ways to convert an image to black and white in both Photoshop and Lightroom. I could re-open the image in Lightroom to do adjustments but instead am using the black and white adjustment tool found in the ‘Adjustments’ panel on the right of the screen. This opens a window with six sliders for adjusting colours independently. There’s also the ability to play around with the tint so, for example, applying a sepia tone to the picture. For an example of how to do this see this video from Adobe. Black and white is really a matter of personal taste so after playing around with the sliders to get the look I’m most pleased with I’m ready to save my changes and go back into Lightroom.
Here’s what the image looks like now in Photoshop having made these final adjustments.

Once you are happy with the changes you need to decide whether to collapse all layers before saving. Remember once you do this there’s no individual adjustments to be made any more. The advantage of collapsing layers is that the file size gets dramatically reduced (from 145 MB to 35MB in this case). Once back in Lightroom the image can be exported to a file of the appropriate format for the output media. Here’s the final JPEG file.


Leave a comment