In two previous posts on the subject of off-camera flash (OCF) I discussed the kit needed as well as an actual shoot. Since those two posts I’ve discovered the amazing Cactus flash system which I’ve written about here. Prompted by some questions from a reader of this blog I realise I’ve not actually described how to set up the flash units themselves as well as what settings to select on your camera when shooting off-camera flash. The aim of this post is to fix that omission. Let’s start with the camera itself.
- I always shoot RAW and using OCF is no different so my camera is pretty much always set to that.
- I always use the lowest ISO on my camera which for the OM-D’s is 200 (there was a firmware upgrade to get ISO 100 on the E-M5 but I never installed that). This ensures least amount of noise in the images.
- For white balance I either use ‘flash’ if that is the predominant source of light or set white balance to ‘auto’ if there is a mix of flash and ambient light. Provided you shoot RAW you can always fix this afterwards in Lightroom anyway.
- If you are going to be post-processing in Lightroom or Photoshop you could also change the colour space from sRGB to Adobe RGB so you can capture the widest possible rage of tones. I never do this and I’m pretty sure for most uses (i.e. on the web) the difference you see is going to be minimal. There’s a tonne of articles out there that discuss colour spaces, such as this one, but if I was you I’d just stick with sRGB.
- For OCF you should always use manual exposure. Make sure the shutter speed is set to your cameras maximum sync speed or below else you’ll get a nice black line running across your image. I always use a shutter speed of 1/125 which is a stop or more below my E-M1 (1/320) or E-M5 (1/250) sync speed. There will be a slight delay caused by the communication between the trigger and the flash so it’s always best to leave a stop or two spare.
That’s about it for your camera. Next you need to attach a trigger (the Cactus V6 Wireless Flash Transceiver in this case) to your cameras hot shoe. There’s a lot of stuff you can do with these triggers including programming them for different flash guns. For now we just need the basic settings to get them to work with the Cactus RF60 Wireless Flash. The two diagrams below show front and back views of the V6.


Here’s the basics of what you need to do:
- First set the Mode switch to ‘Tx’ (transmit) as you need to transmit a signal to the flash.
- Next you need to set a channel. There are 16 possible channels for the Cactus flashes. You need to ensure the transceiver and flashes are all set to the same channel. Press the Menu button and when you have the ‘Channel’ option press the OK button and rotate the Selection dial to the channel number you want then press the OK button.
- Now you need to set a group. There are four groups: A, B, C and D, allowing you group flashes together and fire one or more groups at a time. If you are firing up to four groups it’s best to put each flash in a separate group. This allows you to individually control output and zoom range but also fire them together. Let’s assume you are going to fire two flashes, one each in groups A and B so press the A and B buttons to fire both flashes at the same time.
- Finally you need to ensure you have the ability to zoom the RF60 Flash remotely from the V6 Transceiver. This is not enabled by default and how to configure it is well hidden in the user manual (it’s actually in section 15.3). Press the Menu button and scroll to the ‘Sub-Menu’ then press the OK button. Scroll to the ‘Swap Control’ then select ‘Zoom (Cactus)’. Press the Menu button again to return to the main screen. Now when you have a Cactus VF60 Flash in range and you press the Selection dial you’ll be able to change the zoom of the flash by rotating the dial. Note that this only works on Cactus flashes.
Next to the Cactus RF60 Wireless Flash setup.
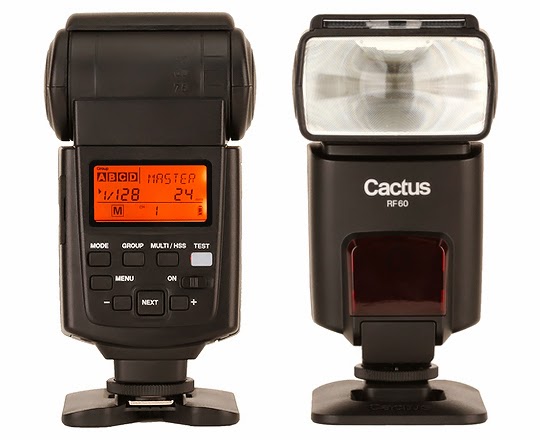
- There are three operating modes in the RF60. Local, Master and Slave. For shooting OCF you’ll be using Slave mode. Press the Mode button twice to select this mode.
- Next set the channel by pressing the Menu button and use the + and – buttons to select the same channel as was set previously on the V6 Transceiver.
- Finally set the group by pressing the Group button multiple times until the appropriate group ‘A’, ‘B’, ‘C’ or ‘D’ is selected.
That’s it! You can now control the power and the zoom from the previously set up Cactus V6 Transceiver on the camera by rotating the Selection dial (press it to change the zoom).
These are the very basic instructions for setting up and getting going with the Cactus flash system. There are loads of videos out there (check out the Cactus channel on YouTube) to get help with more advanced settings and uses.
Good luck and happy OCF’ing!


Leave a comment